
The useful idea first
Sheet mulching is a slow way to prepare a garden area, not an instant finished bed. Learn how to choose a suitable site, arrange clean layers, watch what happens underneath, and decide when the soil is ready for plants.
What you will be able to do
- Decide when sheet mulching is a suitable lawn-removal method.
- Plan a small bed with safe materials and clear edges.
- Check moisture, weed regrowth and planting conditions before calling the bed ready.
Before you begin
Try these first. Notice what you already know.
Words worth knowing
- Sheet mulching
- Covering a growing area with a temporary light-blocking layer and mulch.
- Rhizome
- A stem that grows below the soil and can send up new shoots.
- Decompose
- Break down through the work of living organisms and natural processes.
- Crown
- The area where a plant’s stems meet its roots.
- Root flare
- The widening base of a tree where the trunk meets major roots.
- Organic matter
- Material that came from living things, such as fallen leaves and finished compost.
See the quiet work beneath the cardboard
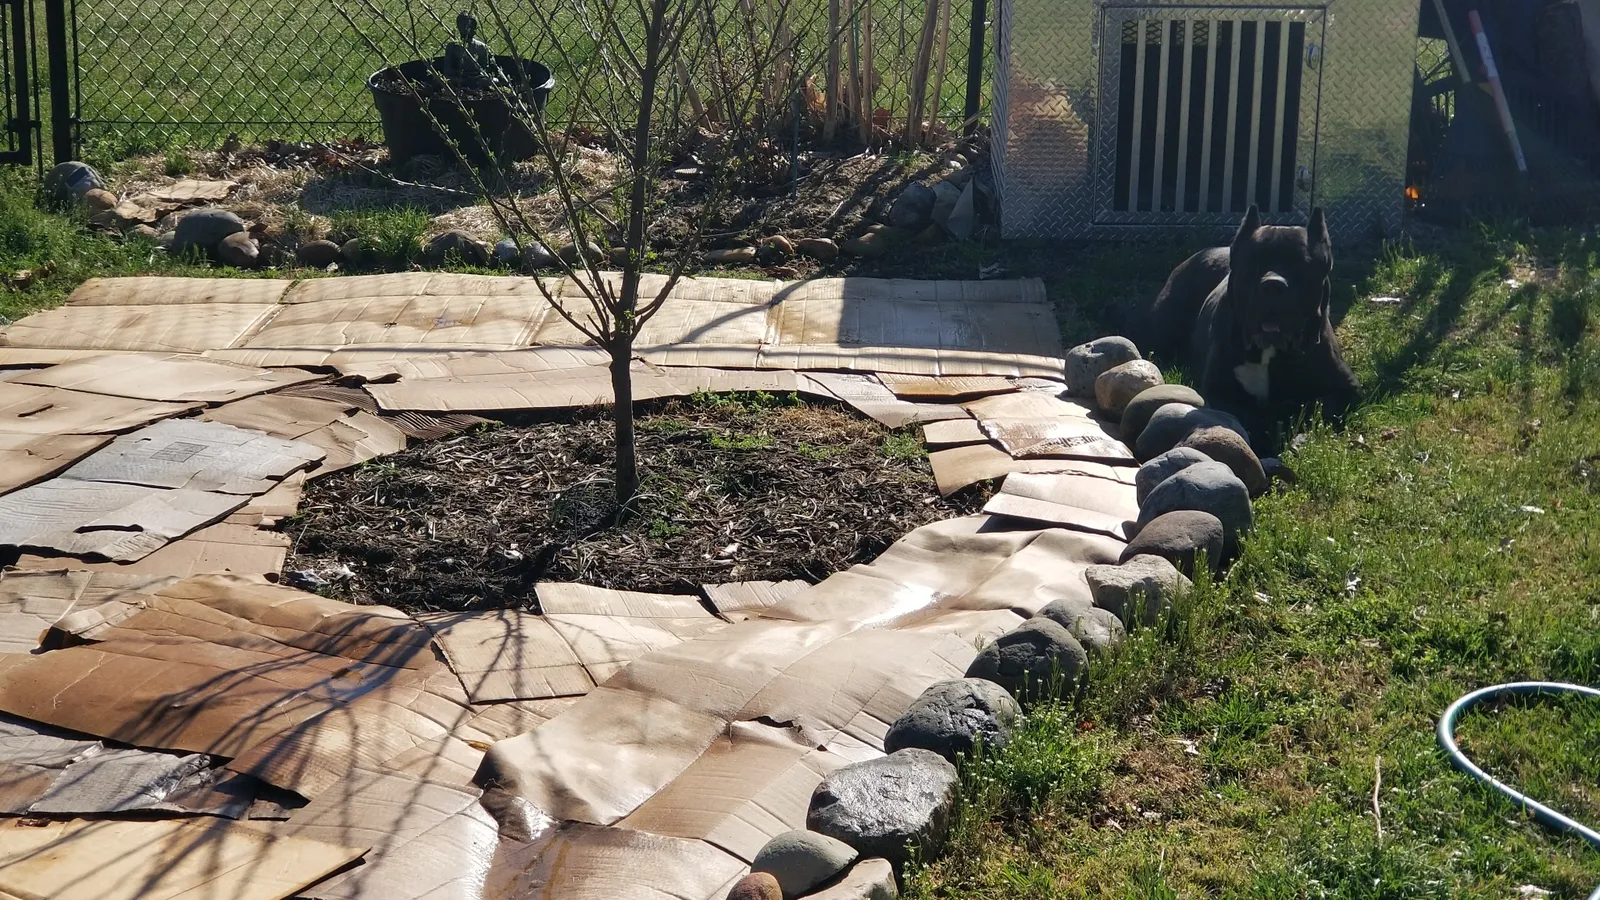
A new sheet-mulched bed may look like a collection of boxes spread on the lawn. That early stage does not show you the work happening below. A light-blocking layer can reduce the growth of suitable existing vegetation. Mulch holds that layer in place and protects the surface. Over time, the materials change and break down. The result depends on the plants already there, the weather, the soil and how you care for the area.
Think of sheet mulching as a site preparation method, not a promise of perfect soil. It will not remove buried rubble, fix a low spot that floods or make an invasive plant disappear just because you cover it. It can be useful when you have time and want to limit digging. Begin with a small area so you can learn how the method behaves in your yard. An honest view of the rough beginning makes the later progress easier to understand.
Identify what is growing before covering it
Look closely at the plants in the proposed bed. Ordinary lawn grass, annual weeds and tough spreading perennials do not respond in the same way. Some plants store energy below ground and can grow around a cover or push through gaps. Others spread by roots or stems into the area from outside. Covering them without a plan may give them a temporary pause rather than control. Identify the main plants before ordering a large load of mulch.
A local Extension service can help with a plant you do not know. Take pictures of leaves, stems, flowers and the whole growing area. Ask whether the plant needs removal before sheet mulching and how to handle its roots or seeds. Do not move pieces of a troublesome plant into your compost or a new garden without knowing whether they can regrow. The time spent on identification may save much more time than adding another layer over a problem later.
Choose a place that suits the future garden
Walk the site at different times of day. Note direct sun, shade, water access and the route you will use to reach it. A bed prepared for sun-loving vegetables will disappoint if it sits in deep shade. A flower bed beside a path should leave enough room to walk when its plants reach full size. Make these choices before covering the grass. Soil preparation and garden design work best when they solve the same problem.
Watch the site after rain if you can. Look for standing water, runoff from a roof and places where soil washes away. Sheet mulch is not a drainage repair. Cardboard can also behave differently on a wet, heavy soil than on a well-drained site. If the area stays soggy, ask for local guidance before covering it. You may need another method, a different garden location or changes to water flow rather than a deeper pile of material.
Start small enough to finish well
A modest test bed is easier to prepare, monitor and plant than half a yard. Choose a size that matches your supply of clean material and the time you have to move it. Leave clear access for a cart, hose and your feet. If you will work from both sides, make sure you can reach the middle without standing in the bed. A smaller finished project teaches more than a large partly covered area with exposed edges.
Estimate materials before you begin. Multiply the planned length by width to find the area. Then choose a mulch depth based on the local method and materials you will use. Convert inches to feet before calculating volume. A three-inch layer, for example, is one quarter of a foot. Use the Garden Calculator to compare bagged and bulk amounts. Allow for overlap in the paper layer and for uneven ground, but do not buy twice as much simply because a deeper pile sounds better.
Lay out the outline on the ground
Use a hose, string or stakes to show the bed shape before making a permanent edge. Stand back and look at it from the house. Walk around it with a mower or cart in mind. A tight curve may look graceful in a sketch and become hard to maintain beside a lawn. A straight bed can be a good choice where space is narrow. The outline should help the future garden work, not just fill an empty patch.
Mark the paths at the same time. People need a place to stand while caring for plants. Keep the bed out of routes used by children, pets, delivery workers or equipment. Do not cover utility lids, drains or access points. If you plan to dig an edge, drive stakes or install a structure, check the local utility-location requirements first. Sheet mulching limits soil disturbance, but the extra work around it can still involve digging where hidden services may be present.
Protect the plants that will stay
Decide which existing plants belong in the new design. Mark them clearly before anyone starts spreading cardboard. A lavender plant, small shrub or tree may look minor beside a large pile of material, but its original planting depth still matters. Do not bury the crown or root flare under fresh layers. Adding depth around a living plant can create a problem even while the nearby grass is being controlled successfully.
Leave clear space around stems and trunks, using plant-specific mulch guidance. Keep layers away from the bark and check again after rain or wind moves material. Avoid digging through major tree roots to create a neat edge. Large trees also influence the light and moisture available to the future bed. They need their own care plan. If you cannot protect an established plant while using the method, change the bed shape or choose a different preparation approach for that part of the site.
Select plain, clean materials
Choose a suitable light-blocking material that can break down, such as plain unwaxed cardboard or newspaper without glossy inserts. Remove tape, staples, plastic labels and other pieces that do not belong in soil. Flatten boxes so you can see what is attached. Avoid material with an unknown spill or coating. A free box is not a bargain if you must pick plastic strips out of the bed for the next several years.
Keep the top mulch separate in your planning. Leaves, bark or wood chips have different textures and settle in different ways. Use material suited to the site and the method you follow. Fresh grass clippings from a lawn treated with herbicides may be unsuitable. Check the product label and local guidance rather than guessing when clippings become safe. Do not add weeds carrying mature seed heads or roots that can regrow. Clean inputs reduce new problems while you work on the old vegetation.
Prepare the surface without creating needless damage
Mow suitable lawn short if that is part of your chosen method. Pick up rubbish, large stones and branches that would leave holes beneath the cover. You do not need a perfectly smooth surface, but the paper layer should sit close enough to the ground to block light. Large ridges can create channels where plants find a way out. Take a last look for irrigation parts, plant markers and items you may want to retrieve.
Avoid working wet soil into a compacted surface. You can damage soil structure by repeatedly walking or rolling a loaded cart over it. Set up a path for bringing materials to the site. Spread the work across several manageable sessions if that helps you avoid injury or rushed choices. Sheet mulching is often described as easy, but lifting wet cardboard and moving mulch still take effort. Use loads you can control, suitable gloves and tools that fit the job.
Overlap the layer with intention
Gaps give existing plants access to light. Arrange your cardboard or paper so pieces overlap rather than meeting edge to edge. Work from one side across the bed and check the joins as you go. The amount of overlap can follow the local method you have chosen. Pay special attention to corners, cuts around retained plants and the outer edge. A small uncovered strip can become a long weedy line once the bed is planted.
Wet the paper layer as directed for your method so it lies down and stays in place. Do not leave loose dry sheets exposed to wind while you fetch more mulch. Complete one part well before opening the next. If the ground slopes, consider how rain will move over the surface. A blanket of material does not automatically stay on a steep slope. In difficult conditions, a different erosion-control or planting method may be more suitable than trying to hold a sliding layer in place.
A small bed preparation checklist
| Example | Example checks per stage |
|---|---|
| Site and weeds | 3 |
| Materials and layout | 3 |
| Layering day | 3 |
| Review before planting | 3 |
Watch it in practice
Sheet Mulching: Lawn to Garden Bed in 3 Steps — Penn State Extension
Cover the paper without making a mountain
Add the chosen mulch in a reasonably even layer. The aim is to cover and stabilize the barrier, not to bury the site as deeply as possible. Follow depth guidance suited to the specific materials and use. A deep preparation layer for a new empty bed is not the same as routine mulch around established trees and perennials. Keep those situations separate. More material can make it harder to inspect moisture and can bury nearby plants.
Spread mulch with a tool you can control, then step back and check the surface. Look for bare paper, thin edges and piles pressed against a stem. Do not walk over the finished bed if you can avoid it. You may need to add a little more where loose material settles, but first inspect what is happening underneath. A patch that looks low may still have enough cover. Use observations instead of topping up every area to match the tallest pile.
Make water checks below the surface
The appearance of the top layer does not tell you exactly how wet the soil is. A dry-looking wood chip surface may cover moist ground. A wet surface may also hide a dry patch where water has not reached the soil. Lift a small edge or open a narrow inspection spot. Check both the layer and the ground below it. Then put the material back so you do not leave a light gap for grass to use.
Water according to actual conditions, the season and local guidance. The purpose is not to keep everything soaked. Prolonged saturation can reduce air in soil and create problems for roots and soil life. In a dry spell, some moisture may help the materials stay in contact and begin to change. Rainfall, soil type and mulch texture all affect the result. Record what you find so the next check has a point of comparison instead of depending on memory.
Give the process a realistic calendar
Plan backward from when you hope to plant. A fall project may have several months before spring, while a late spring project has much less time before summer. Decomposition does not follow a fixed date for every yard. Warmth, moisture, material thickness and the vegetation below all affect the pace. A calendar is a planning aid. The condition of the bed is what tells you whether it is ready for the next step.
Include a review date rather than only a planting date. At that review, lift a small section and inspect the soil, paper and remaining vegetation. Look for live shoots and roots that may need further control. Check whether water moves into the soil. If the bed needs more time, you can use containers or another prepared area for the plants waiting nearby. Keeping a backup plan prevents a late seed order or a crowded windowsill from forcing you to plant into an unready site.
Expect some weeds and respond early
Sheet mulching does not create a weed-free future. Seeds can arrive on the wind, in soil on shoes or in material you add. Spreading plants can enter from the edge. Some old plants may find a weak point in the barrier. Walk the bed regularly and identify new growth while it is small. The response should match the plant. A seedling near the surface is a different problem from a deep-rooted perennial returning through a seam.
Do not simply bury every new shoot under another handful of mulch. Check where it begins and whether it is part of a larger root system. Remove or manage it using suitable local advice. Keep weeds from setting seed when possible. A short, regular observation habit usually works better than a long rescue session after the area is overgrown. Record repeat trouble spots. They may show you where the edge, overlap or original weed-control plan needs improvement.
Inspect before opening the bed for planting
When planting time approaches, examine several places rather than only one easy corner. Check the middle, an edge and a spot that was especially weedy. The paper may have softened or may still be firm. Existing plants may be dead or may have live roots ready to regrow. Soil should be suitable for the plants you plan to use. A neat mulch surface is not proof that the whole site is ready.
Use local planting guidance for your crop and the condition you find. In some prepared beds, you can move mulch aside and plant into the underlying soil. In others, you may need to remove remaining barrier material or give the bed more time. Do not plant roots into a thick loose mulch layer and call it soil. Check the finished planting depth and keep mulch off the plant crown. Water the new plant at its roots, then monitor it as you would any other transplant.
Separate soil improvement from fertilizing
As suitable materials break down, they can contribute organic matter and protect the surface. That does not tell you exactly which nutrients the future plants need. A large pile of leaves is not a soil test. Before adding lime or fertilizer, use a suitable soil test and follow local interpretation. The right choice depends on the existing soil and the crop. Guessing can create an excess as easily as it can leave a shortage.
Keep woody mulch mainly on the surface unless a local method specifically tells you otherwise. Mixing large amounts of fresh woody material into a planting zone is different from placing it above the soil. If you bring in compost, ask about its source and quality. Use amounts supported by the garden plan rather than treating compost as a harmless material that can be added without limit. Soil care is a set of linked decisions about structure, water, nutrients and plants, not one magic ingredient.
Use photographs to learn from the rough stage
Take a picture before covering the lawn. Include a fixed feature, such as a fence corner, so you can compare later views. Photograph the paper overlap and the finished surface. Add the date, materials and any difficult areas to your Garden Journal. These records are especially useful when winter weather changes the surface or a weed returns in spring. They help you connect a later result to what you actually did.
Do not judge the method only by whether the first picture looks attractive. A preparation stage has a different purpose from a finished planting. A plain temporary edge and a tidy surrounding path can make the work look cared for while you wait. If appearance matters to a household member or neighbor, explain the plan and likely next step. A simple marker saying that a future garden is being prepared can make an unfinished-looking area easier to understand.
Know when to choose another method
Sheet mulching is one option among several. It may not suit a site with difficult spreading weeds, poor drainage, a steep slope or an urgent planting deadline. It can also be awkward where existing roots and crowns leave little room for a cover. Choosing another approach is not a failure. It means you are matching the method to the problem rather than asking the problem to fit a favorite technique.
Compare the time, labor and follow-up required by local lawn-removal methods. Ask about impacts on the plants and soil you want to protect. You might prepare only part of a site this season, use a different control method in a trouble patch, and leave a useful lawn path between beds. A good garden often grows in stages. The real measure of success is a site you can plant and care for with confidence, not the number of cardboard boxes you manage to spread in one day.
Try it in your own space
Choose a small possible garden area. Sketch its shape, identify the existing plants and mark anything that must remain uncovered. Calculate the area and estimate materials for a locally suitable method. Make a plan for one inspection spot and three review dates. Do not start covering the area until you can explain how the future plants will get light, water, access and a suitable root zone.
Your next-step checklist
- Identify the existing weeds.
- Check sun, drainage and access.
- Protect retained plants and utility access.
- Use clean suitable materials and remove tape and plastic.
- Overlap and cover the barrier carefully.
- Check moisture and regrowth below the surface.
- Inspect the bed before planting into soil.
Check your understanding
Check your reasoning. You can try again.
References and further reading
Original teaching text by Perennial. These references provide deeper detail and local guidance.